Sunday, September 30, 2012

Teaching Context Clues

I love teaching vocabulary! One of the best strategies I've come up with is to use a graphic organizer and PowerPoint. The PowerPoint is set up to give first the word and then the sentence. After revealing the word and sentence, I have the students guess what synonym would best replace the vocabulary word. It helps to actually put their guess in the sentence. That way they can see if it makes sense or not. I also show them how sometimes the definition to the word can be found in the sentence. Finally I reveal the synonym and picture for the vocabulary word and the students fill in their graphic organizer. Notice there is no section for the sentence. I don't think it is necessary, and it takes many students entirely too long to copy it all down. I only have them write the synonym and not an entire definition for the word, too. I find my students retain this bit of information far better than a long definition, and also the standardized test ask for the synonym only. For your FREE COPY of the graphic organizer and PowerPoint visit my TpT store  HERE or click on the picture above.
These vocabulary words can be found in the book Bad Case of Stripes. This book can be viewed for free on the website Storyline Online. Use this vocabulary lesson before or after listening to the book online.

 Click on the video for the link to the online book.

Sunday, September 23, 2012

Fraction Fest: CCSS Aligned Hands-on Activities


I just finished up a two week introduction to fractions. My students were pretty much blank slates when it came to fractions. Our state standards did not put much emphasis on fractions but the new Common Core has 4th grade teaching students EVERY little thing about fractions. At first I was really stressed out about it, but I'm loving teaching fractions. I think it is actually more fun to teach something the students know nothing about. I finished up the introductory unit with a FRACTION FEST. [This is similar to the Geometry Fest I told you about earlier in the year. Click HERE if you'd like to check out this freebie.] I had six stations set up around the room. Each activity dealt with a different and larger denominator. I started my struggling students out at the station with the smallest denominator. These activities were perfect for cementing those introductory fraction concepts in their mind. By the end of the day a could see the light bulb start lighting up for those struggling learners. The culminating activity was a Toddler's in Fractioniara"s Pageant. (If you don't get the name, check out TLC's Toddler''s in Tiaras.)  My students created the CUTEST little outfits for the Fraction Wear competition. Check out the picture of the "line up" portion of the pageant. Oh yes, I rolled out the red carpet (red butcher paper) and had "runway" music. Of course, I emceed the event and used the applications the students filled out for their toddler while the students walked their toddler on stage. So much fun!


If you'd like to purchase my Fraction Fest Unit, click HERE.

Sunday, September 16, 2012

Common Core Math Freebies

This year my district started implementing Common Core Math. I spent the summer learning all about problem based math. One of the things they stressed was providing students with a Math Tool Kit. Students are to decide  for themselves what tools they need to solve their math problems. In their Tool Kits (plastic baggies),  I've included two sided counters. [These can easily be made with a circle punch and scrapbook paper. Purchase a solid color, laminate, and punch out the circles. The front will be colored and the back will be white.] I also included some math reference cards from Really Good Stuff. [ You could make your own or take pictures of math anchor charts, laminate, and put on a ring.] Basically you put anything you think would help students be able to independently solve word problems in the Math Tool Kit. I try to make most of the items cheap because manipulatives tend to get lost as time goes by. Even though I stress being careful and looking all around for pieces before we put the kits away, pieces still occasionally come up missing.  I keep a spare parts kit available for replacement. I stick those items found laying around after the kits have been put away in the spare parts kit, too. It makes me less grumpy that way:)
Have you seen these? They are place value disks and are intended to replace the base-ten blocks for older students. I love them, but they are way too expensive to buy for an entire class, so I created my own.  After I created them, I thought about how hard they would be to cut out. If I had just the right circle punch I could do it a lot easier but still it's not something the kids could do. SO..... I created place value squares! Print each disk or square on a different colored paper, laminate, and cut out.  My students were able to cut the square ones out themselves. I had them put them in bundles of ten and clip with a paperclip. We keep them in plastic baggies. You may pick a free copy of each by clicking on the pictures below. The disks have a place value mat included, in case you don't have any.


Another thing I've created for my classroom is a floor number line. USE PAINTERS TAPE for the line!!! When you are ready to remove it comes off very easily. I used masking tape last year and it was so hard to remove. Use clear tape for the numbers.
To introduce the number line, I have my students dance the Number Line Hustle. I use the music The Hustle by Van McCoy. I call out different numbers on the number line and they count the steps as they dance to that number. I only call a few students students to dance at one time. Then we play Number Line Taste Test. I have a variety of candy (some sour and some sweet) and they rate the taste of it by standing on the number they think it represents. You can find some gross candy at Halloween time, to insure you get some negative numbers represented. Click on the picture for your free copy.

Good luck as you continue to make magic in your classroom!


Friday, September 7, 2012

Zebra Pens Are Perfect for the Classroom


 Over the past few years I've become very fond of office supplies. I love to browse the latest gadgets at the office supply store. I'm especially partial to pens, so I was exited to be asked to review some products from Zebra.  If you are looking for the perfect red grading pen, Zebra has exactly what you need.
The M-301 Mechanical Pencil is extremely durable. It has a non-slip grip that ensures full writing control. The refill process is easy and effortless.


 The Z-Mulsion EX ballpoint pen is light weight pen with a rubber grip. It has a super smooth ink glide.  With its designer metal pocket clip it is a very sophisticated looking pen.
My 7th grader has been trying this mechanical pencil out over the past week. She freaked out when her little sister touched it, so I would say it is big hit. She liked the fact that you could erase easily without the lead falling out. The grip was her favorite part.
Overall these pens and pencils were very durable and provided an effortless write .

Saturday, September 1, 2012

Putting a Little Magic in Reader's Workshop and a Freebie


I LOVE to play games with my students. This game is a class favorite. I revamped the game after reading Laura Candler's Power Reading Workshop. (A MUST HAVE for every teacher.) She made me look at AR testing in a different light. AR is huge in our school district and therefore required, but I've made it less of an emphasis in my classroom. The old version of the game allowed students to draw a card after they passed an AR test.

But back to the game, it is played like Candy Land.
Here are step by step instructions for those that aren't familiar with Candy Land.
1. Students complete their book log, book notes, etc. (Anything you want.) and they receive a card. [You will need to make the cards using the free printable at the bottom of this post.]
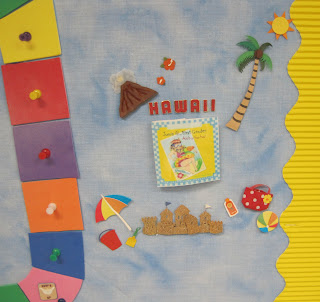
2. The cards have a colored square on them. They move their game piece to that color on the board.
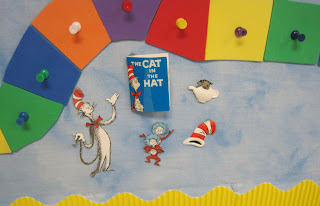
3. They continue to go around the game board until they reach the finish line. That last color on the board is green, and they need to draw a green card to win. [This allows you to limit the number of students that win the game. I have fewer green cards in the deck.]
4. When they make it to the finish line they get out of the treasure box and place their game piece back at the start.
I use this game during my Reading and Writing Conference. The students keep binders that include book notes and book logs. I was having SO much trouble getting the students to keep up wither their book log, and it was driving me CRAZY! It didn't seem to matter that they were losing 5 points from their notebook grade EVERY week. When I started handing out Bookland cards for accurate book logs and completed book notes (one card for each), it was like MAGIC. It just amazes me how positive reinforcement works.

.

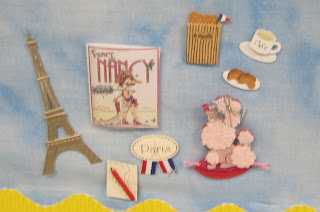
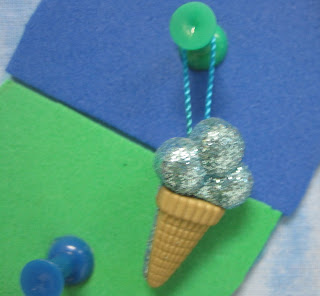
I made the bulletin board using scrap-booking stickers. I got all of mine at Hobby Lobby during their 50% sale. They run this sale a few times a year, and you will definitely want to wait until then because those babies are expensive. The game pieces were also purchased there. They're like mini buttons, and I looped some string through and applied a little hot glue. Each student has a different game piece. I made the books by printing a picture from Amazon, laminating, and folding the picture. I'm sure someone much craftier would do a better job. 


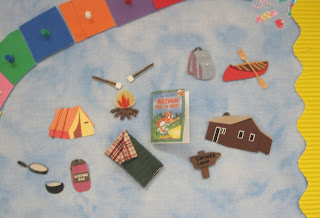
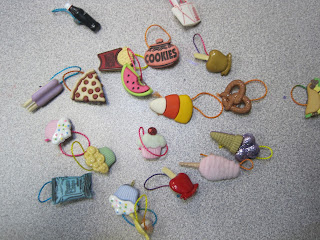
There are infinite possibilities for books and character pieces you could choose. You don't have to use the ones I've created. Just browse the craft store and find the inspiration for your favorite picture book or novel. I'm sure you could also find other reasons to hand out the game cards. I just personally wouldn't give them out for reading and testing on a book. I would love to see what you come up with. There is still space for me to add more:) Click HERE or on the picture below for the game cards. Print on card stock or glue together the two copies, laminate, and cut out. You will need several copies.

A Book Review 
I have no idea if Laura would approve of my playing a game or giving prizes for completed reading binders. I do know her book changed my "Teaching Life". Seriously! If you've read my blog, you know I'm a big fan of hers. This is by far one of my most beloved professional books. For me it unraveled the secret to the Reading Writing Workshop. I had been to countless workshops on this model but it just never seemed to go smoothly for me in the classroom. When I read this book, it was like having a mentor teacher whisper all the secrets to running a successful workshop model in the classroom. The book can be read in a day and feels like you're reading a note from your best friend. By the way, I haven't been paid or compensated in any way to write this. I had written in an earlier post about my students being 100% advanced in literacy, and several people wanted to know how I managed it. This is the book that transformed my classroom, and I give it the credit for the test results. If you teach literacy, you MUST get a copy today. Click the cover to grab a copy. 

If you are a fan/follower, and I sure hope you are, you know I usually keep it short and sweet. This is a marathon post for me, but I have so many things I've been wanting to tell you about. I've just finished my second week of school and have been super busy. I'm sure you know what I'm talking about. My class is AWESOME this year, and I can't wait to share this year with you. I already have 5 posts written in my head, so hopefully I will be posting again soon. I would love to hear from you and good luck as you create magic in your classroom this year!